
In Part 1, I covered the architecture, the event model, and why airport baggage tracking makes such a compelling real-time analytics scenario. In this post, I want to get hands-on and walk through actually setting this up inside Microsoft Fabric — from creating the workspace artifacts all the way through to running the simulator and querying live events.
Let’s get into it.
Prerequisites
Before you start, you’ll need:
- A Microsoft Fabric workspace with the Real-Time Intelligence workload enabled (F2 or higher capacity, or a Fabric trial)
- An Azure Event Hubs namespace with a hub (or you can use Fabric’s built-in custom endpoint in Eventstream — more on that below)
- The Baggage Handling Simulator cloned locally, and Python 3.10+ was installed
If you want to follow along with Azure Event Hubs as the source, a Basic-tier namespace is fine for dev/test. If you’re going direct to Fabric Eventstream, you won’t need Event Hubs at all.
Architecture Overview
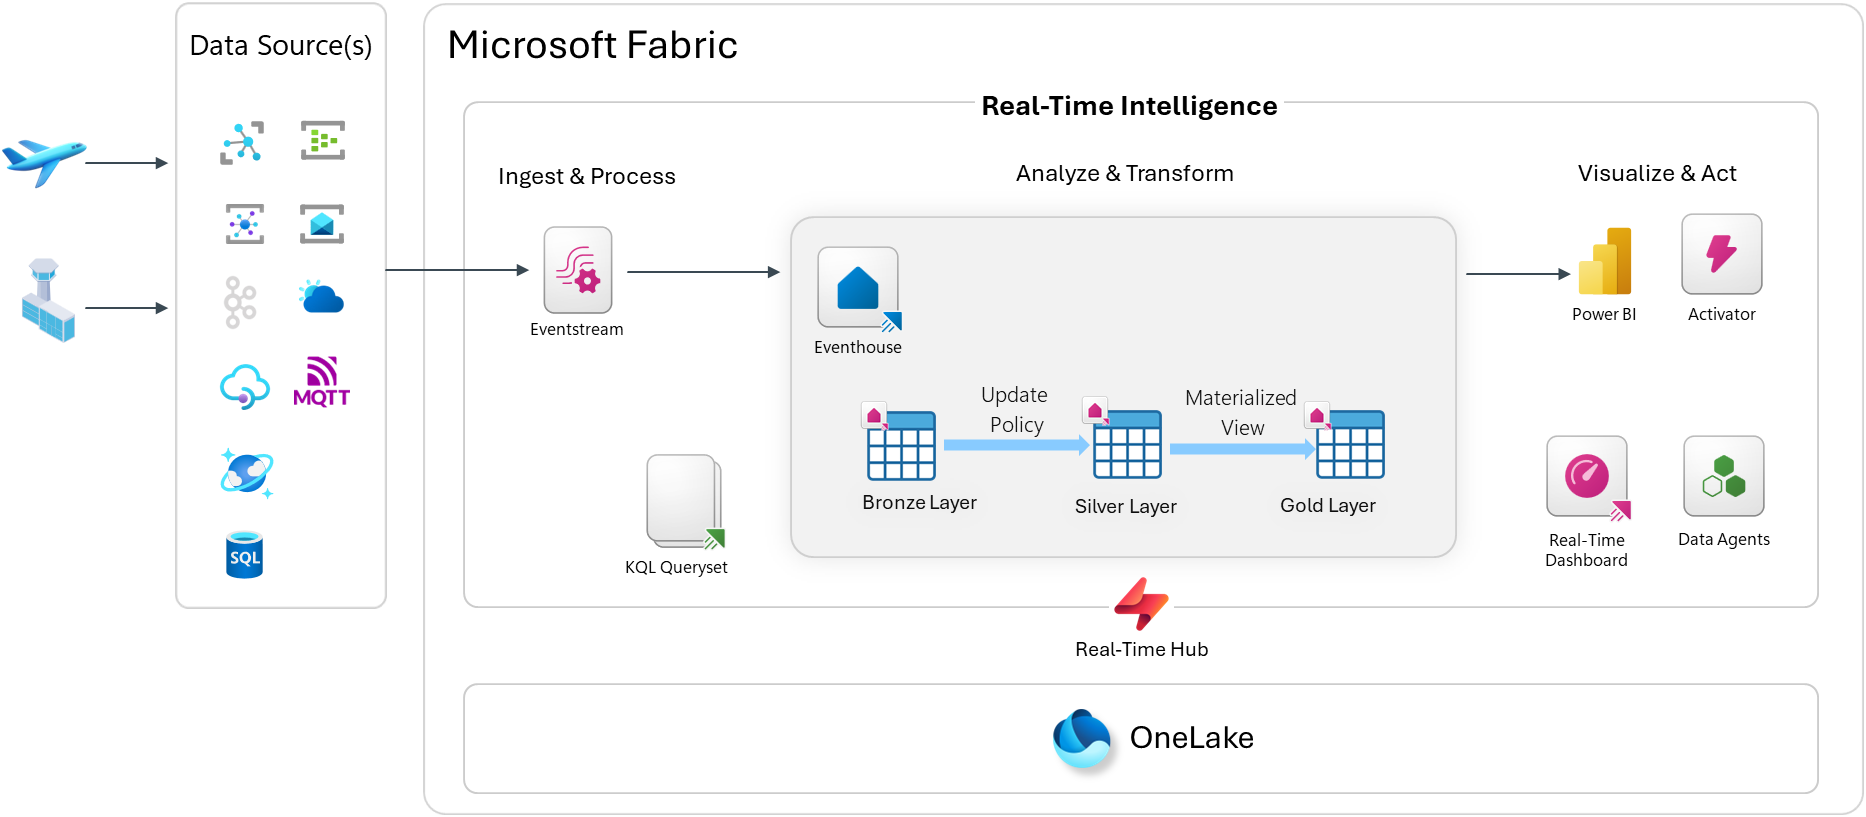
Step 1: Create the Fabric Workspace Artifacts
Start by creating a new workspace if you don’t already have one. I created on called “Airport Operations Demo”. Open up your Fabric workspace, and you’ll need to create four main artifacts:
- Eventhouse (your KQL database)
- Eventstream (ingestion and routing)
- KQL Queryset (ad-hoc queries and saved analytics)
- Real-Time Dashboard (live visualization)
Create the Eventhouse
From the Fabric workspace, click New → Eventhouse. Give it a name like Airport-Eventhouse. This creates an Eventhouse and a default KQL database inside it.

Once provisioned, open the Eventhouse and navigate to the KQL database. This is where we’ll define the table schemas.
Step 2: Create the Table Schema
We’ll use a Bronze / Silver / Gold medallion structure inside the KQL database. Bronze tables hold raw events exactly as ingested. Silver tables hold cleaned and enriched data. Gold tables hold pre-aggregated views.
NOTE: Due to the number of schema objects, I’m going to be showing a subset across each section below. Please go here to see the rest of the KQL scripts to be applied: https://github.com/calloncampbell/BaggageHandling-TypeB-Simulator/blob/main/kql
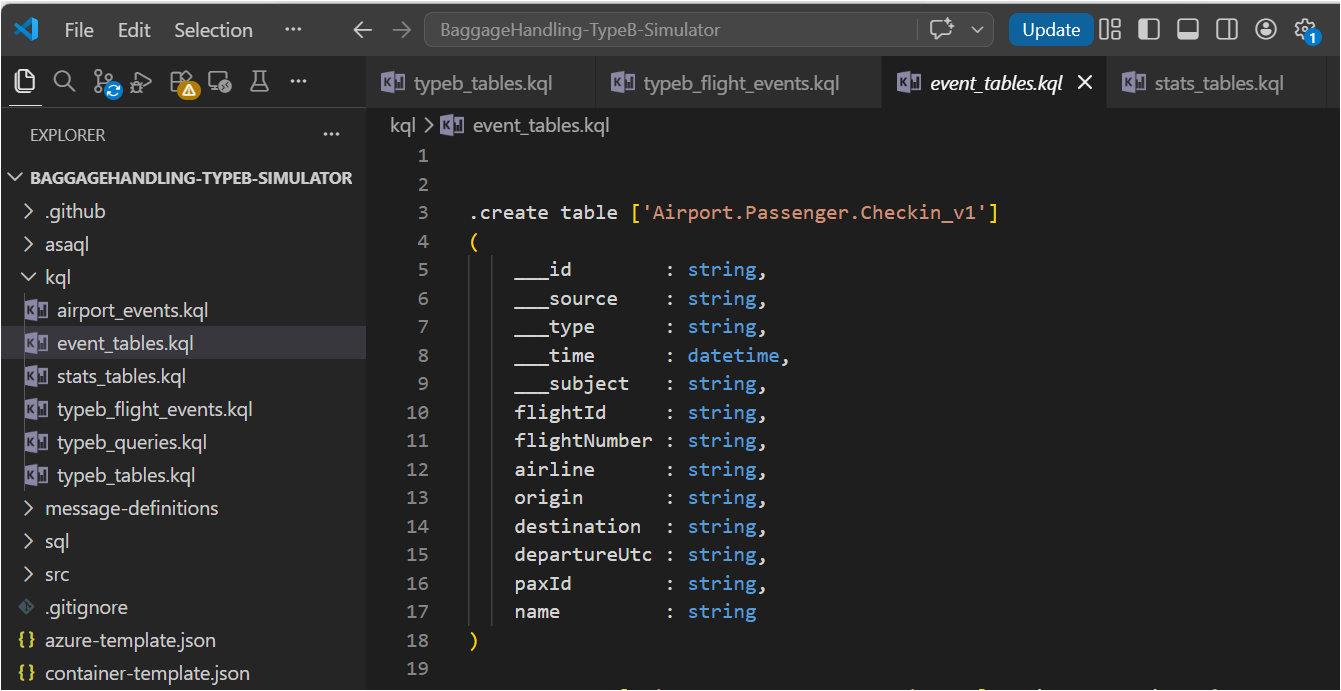
Open the Explore your data pane in the KQL database and run the following to create the Bronze tables:
// Bronze: raw airport events.create table airport_events ( id: string, source: string, specversion: string, type: string, datacontenttype: string, dataschema: string, subject: string, ['time']: datetime, data: dynamic, seriesclock: datetime).alter table airport_events policy streamingingestion enable // Bronze: raw flight operational events.create table typeb_flight_events ( id: string, source: string, specversion: string, type: string, datacontenttype: string, dataschema: string, subject: string, ['time']: datetime, data: dynamic, seriesclock: datetime).alter table typeb_flight_events policy streamingingestion enable // Bronze: event tables .create table ['Airport.Passenger.Checkin_v1']( ___id : string, ___source : string, ___type : string, ___time : datetime, ___subject : string, flightId : string, flightNumber : string, airline : string, origin : string, destination : string, departureUtc : string, paxId : string, name : string)
Ingestion Mapping
When events arrive as JSON via Eventstream, you’ll want an ingestion mapping so the raw JSON gets parsed correctly into the table columns:
// Ingestion mapping for airport events.create-or-alter table airport_events ingestion json mapping "airport_events_mapping"```[ { "column": "id", "path": "$.id", "datatype": "string", "transform": null }, { "column": "source", "path": "$.source", "datatype": "string", "transform": null }, { "column": "specversion", "path": "$.specversion", "datatype": "string", "transform": null }, { "column": "type", "path": "$.type", "datatype": "string", "transform": null }, { "column": "datacontenttype", "path": "$.datacontenttype", "datatype": "string", "transform": null }, { "column": "dataschema", "path": "$.dataschema", "datatype": "string", "transform": null }, { "column": "subject", "path": "$.subject", "datatype": "string", "transform": null }, { "column": "time", "path": "$.time", "datatype": "datetime", "transform": null }, { "column": "data", "path": "$.data", "datatype": "dynamic", "transform": null }]```// Ingestion mapping for flight events.create-or-alter table typeb_flight_events ingestion json mapping "typeb_flight_events_mapping"```[ { "column": "id", "path": "$.id", "datatype": "string", "transform": null }, { "column": "source", "path": "$.source", "datatype": "string", "transform": null }, { "column": "specversion", "path": "$.specversion", "datatype": "string", "transform": null }, { "column": "type", "path": "$.type", "datatype": "string", "transform": null }, { "column": "datacontenttype", "path": "$.datacontenttype", "datatype": "string", "transform": null }, { "column": "dataschema", "path": "$.dataschema", "datatype": "string", "transform": null }, { "column": "subject", "path": "$.subject", "datatype": "string", "transform": null }, { "column": "time", "path": "$.time", "datatype": "datetime", "transform": null }, { "column": "data", "path": "$.data", "datatype": "dynamic", "transform": null }]```
Silver Layer via Update Policy
Rather than running a scheduled job to promote Bronze to Silver, Update Policies do this automatically at ingest time. Define a function that transforms the raw event, then attach it as a policy. In the following example I’ve embedded my KQL query directly in the policy. You could instead create a KQL function for this query and then reference it here instead.
.alter table ['Airport.Passenger.Checkin_v1'] policy update```[ { "IsEnabled": true, "Source": "airport_events", "Query": "let bags = airport_events| where type == 'Airport.Passenger.Checkin' and isnull(array_length(data))==true;let arrays = airport_events| where type == 'Airport.Passenger.Checkin' and isnull(array_length(data))==false| mv-expand data;bags| union arrays| project ___id = tostring(id), ___source = tostring(source), ___type = tostring(type), ___time = todatetime(['time']), ___subject = tostring(subject), flightId = tostring(data.flightId), flightNumber = tostring(data.flightNumber), airline = tostring(data.airline), origin = tostring(data.origin), destination = tostring(data.destination), departureUtc = tostring(data.departureUtc), paxId = tostring(data.paxId), name = tostring(data.name)", "IsTransactional": false, "PropagateIngestionProperties": false }]```// Legacy table name aliases (functions for backward compatibility).create-or-alter function airport_passenger_checkin() { ['Airport.Passenger.Checkin_v1']}
Every event that lands in BaggageEvents_Bronze is automatically transformed and inserted into BaggageEvents_Silver — no pipelines, no orchestration.
Gold Layer via Materialized Views
Materialized Views pre-aggregate data so your dashboard queries are fast, even against billions of rows. Here is a sample useful ones for this use case:
// Gold: latest status per flight.create materialized-view flights_current on table flights { flights | summarize arg_max(updated, *) by flightId}
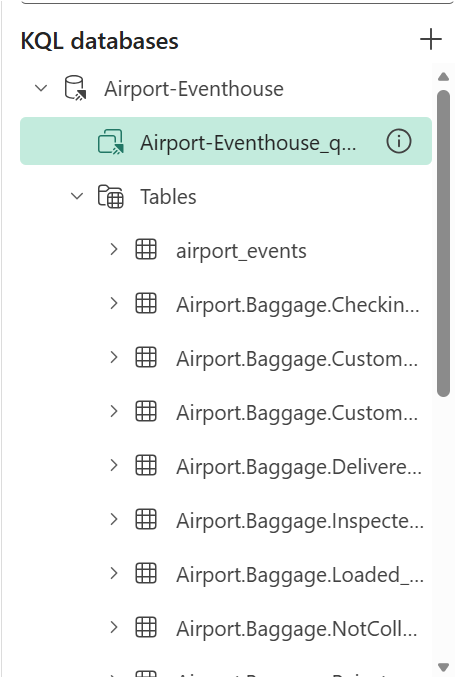
When we’re done, we should see our database schema of tables, materialized views, and functions:
Step 3: Configure the Eventstream
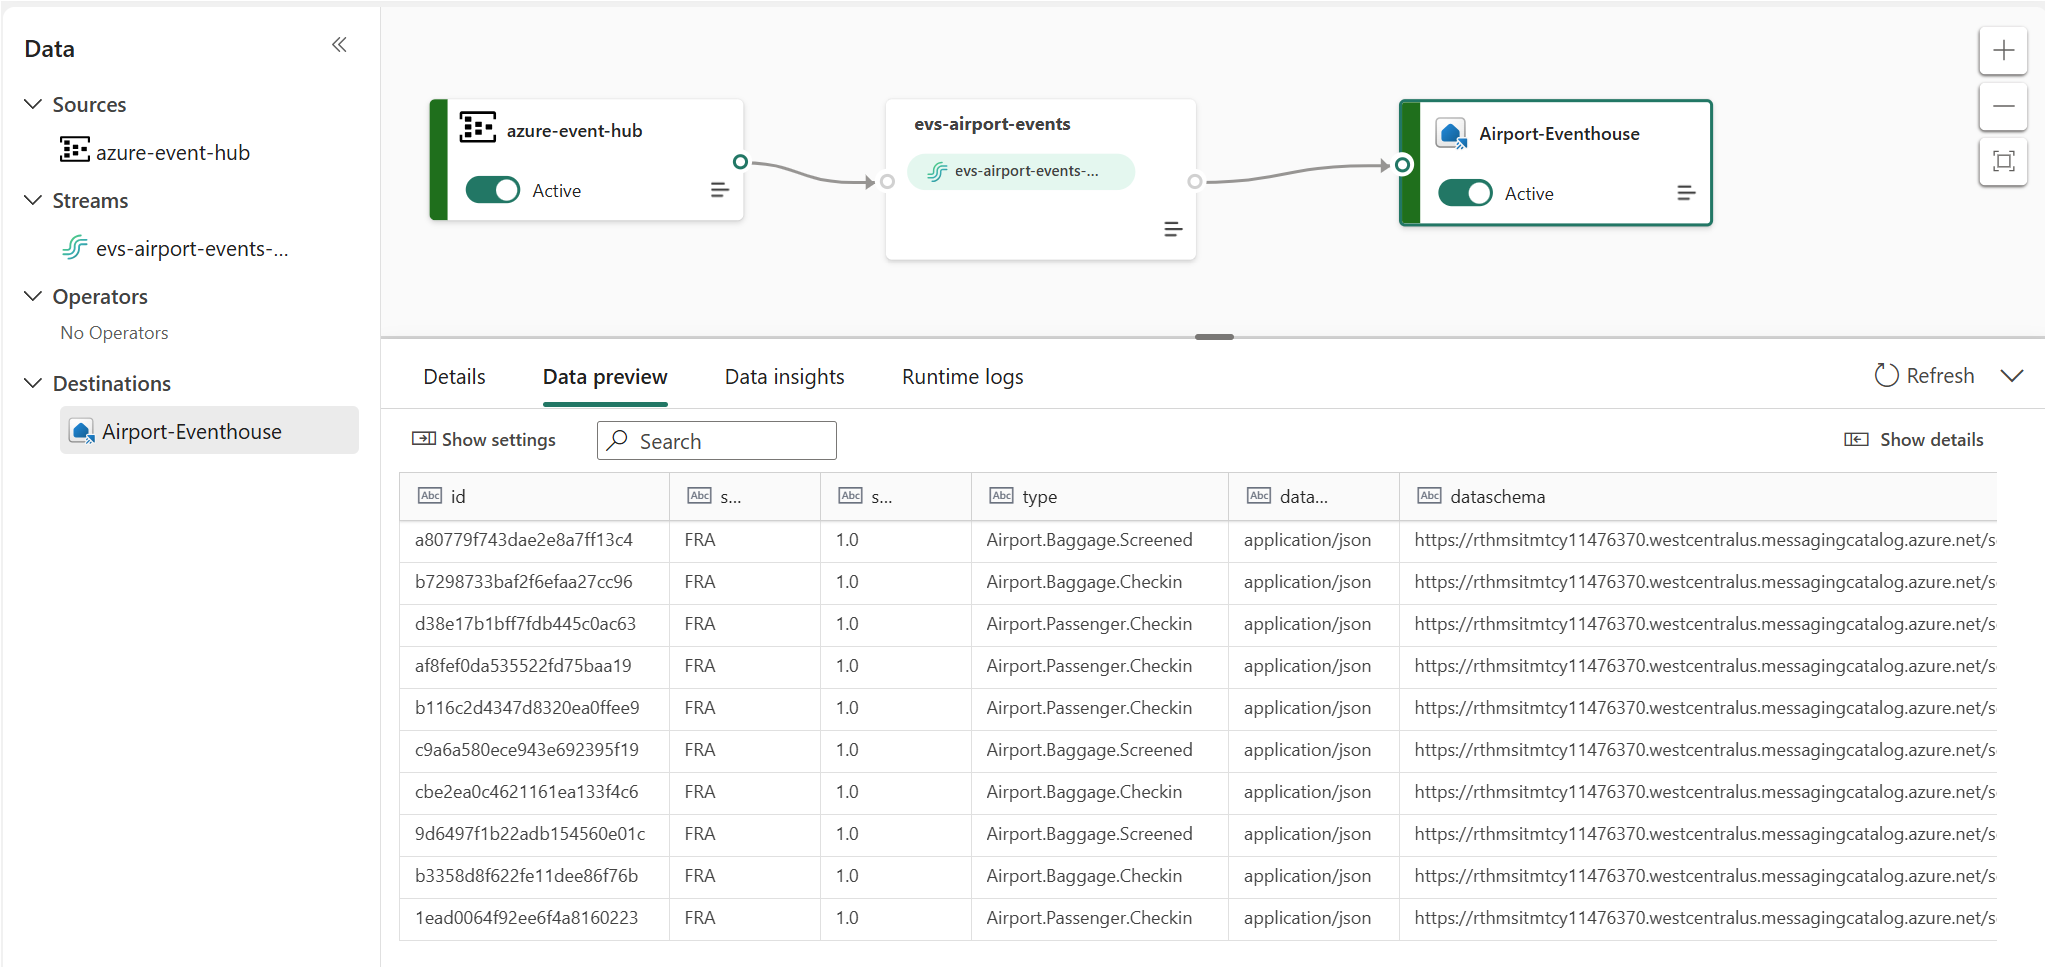
Now wire up the ingestion pipeline. In your Fabric workspace, click New → Eventstream and name it evs-airport-events.
Option A: Azure Event Hubs as Source (what I’m doing)
If you’re publishing events from the Baggage Handling Simulator to Azure Event Hubs:
- In the Eventstream canvas, click Add source → Azure Event Hubs
- Enter your Event Hubs namespace, hub name, and connection string (or use a Fabric connection)
- Set the consumer group — use
$Defaultfor dev/test - Set the data format — use
json
Option B: Custom Endpoint (no Event Hubs needed)
Fabric Eventstream also exposes a custom endpoint — an HTTPS or AMQP ingest URL you can publish CloudEvents directly to, without needing an external Event Hubs namespace. This is great for demos and local testing.
- Click Add source → Custom endpoint
- Copy the connection string — you’ll use this in the simulator config
Add the Eventhouse Destination
- Click Add destination → Eventhouse
- Select the
Airport-EventhouseEventhouse and the KQL database - Select the
airport_eventstable and theairport_events_mappingingestion mapping
Once everything is setup, this is what we should see:
One of the nice features in Fabric Eventhouse that we don’t see in Azure Data Explorer is the Entity Diagram, which is currently in preview. Go back to your KQL database main view and click on the entity diagram button:
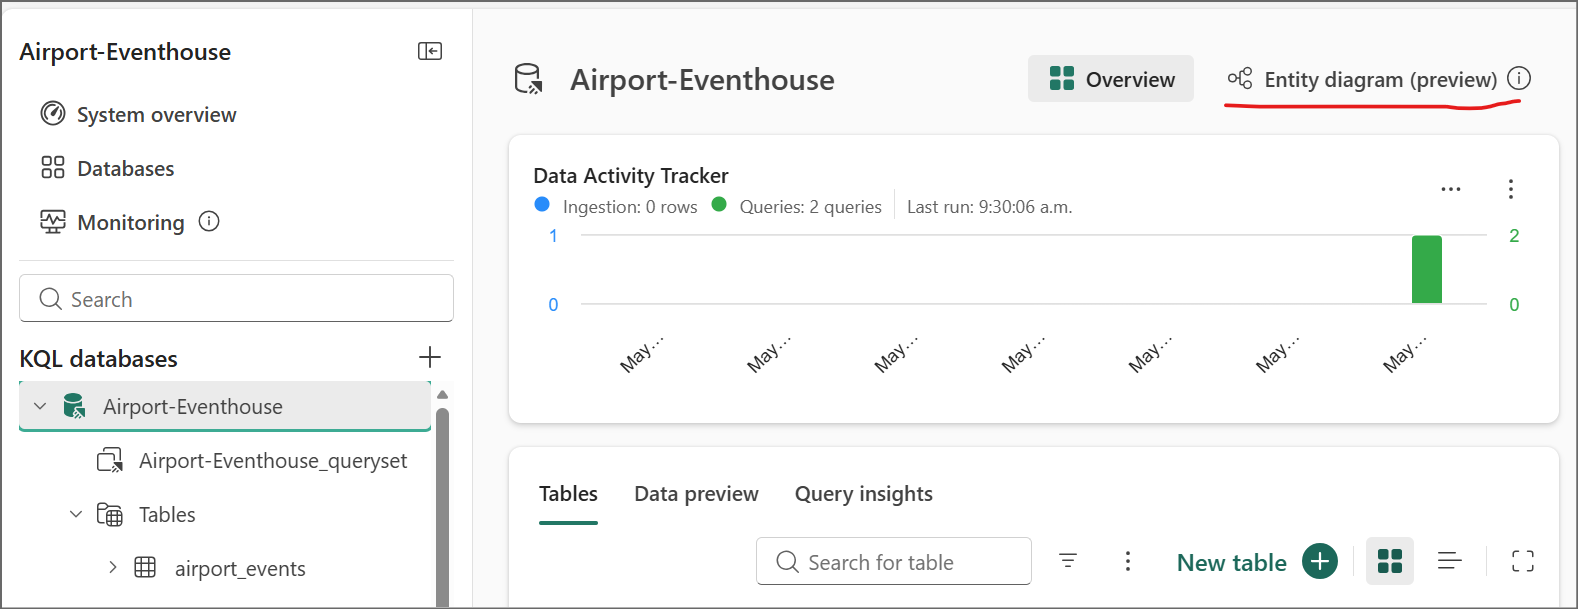
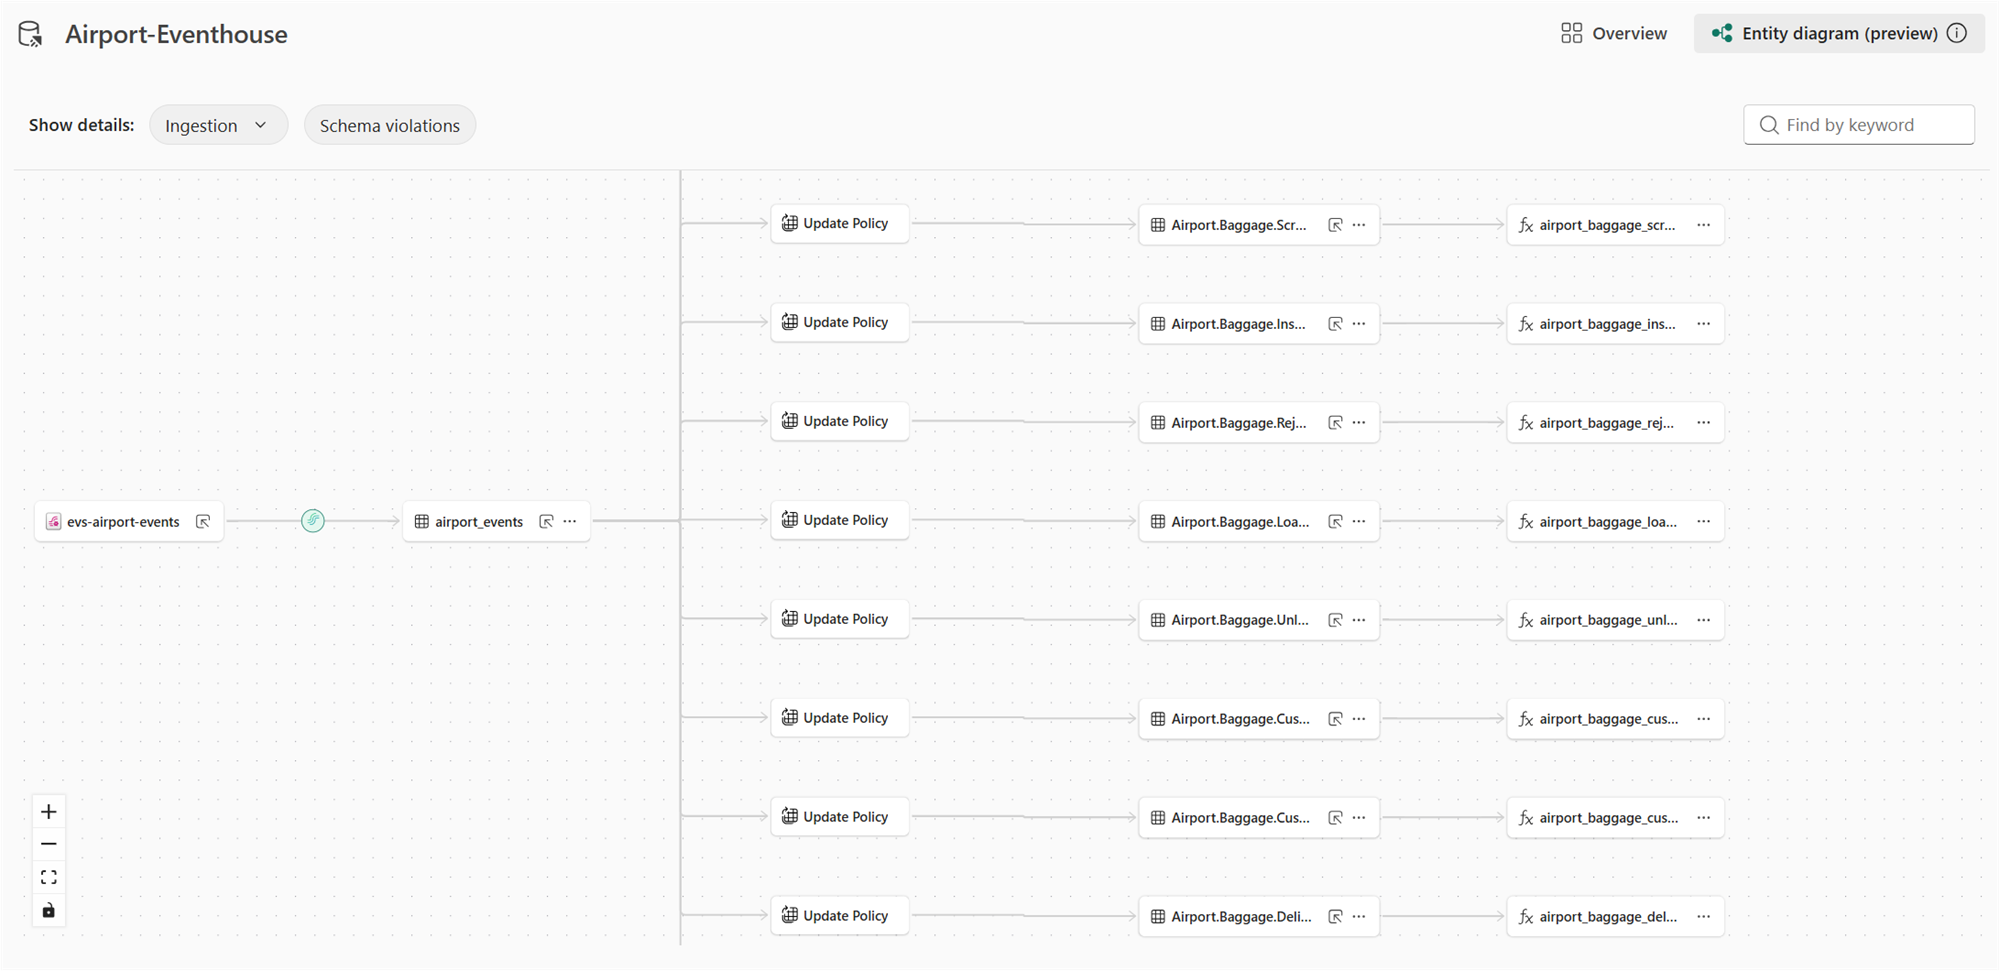
Step 4: Run the Baggage Handling Simulator
Clone the simulator and install dependencies:
git clone https://github.com/calloncampbell/BaggageHandling-TypeB-Simulator.gitcd BaggageHandlingSimulatorpip install -r requirements.txt
Configure the connection string for your Event Hubs namespace or Fabric custom endpoint in config.json (or as environment variables — check the repo README for the exact format).
Run the simulator:
python -m baggage_simulator.cli --verbose --clock-speed 120 --flight-interval-minutes 5 --max-active-flights 5 --eventhub-conn "**********************" --eventhub-name "airport-events-evh"
The --speed multiplier lets you fast-forward simulation time so you don’t have to wait hours for bags to travel through their lifecycle. With --clock-speed 120, a full flight’s baggage cycle completes in minutes.
Within seconds, you should see events flowing into the Eventstream and landing in the Eventhouse Bronze tables.
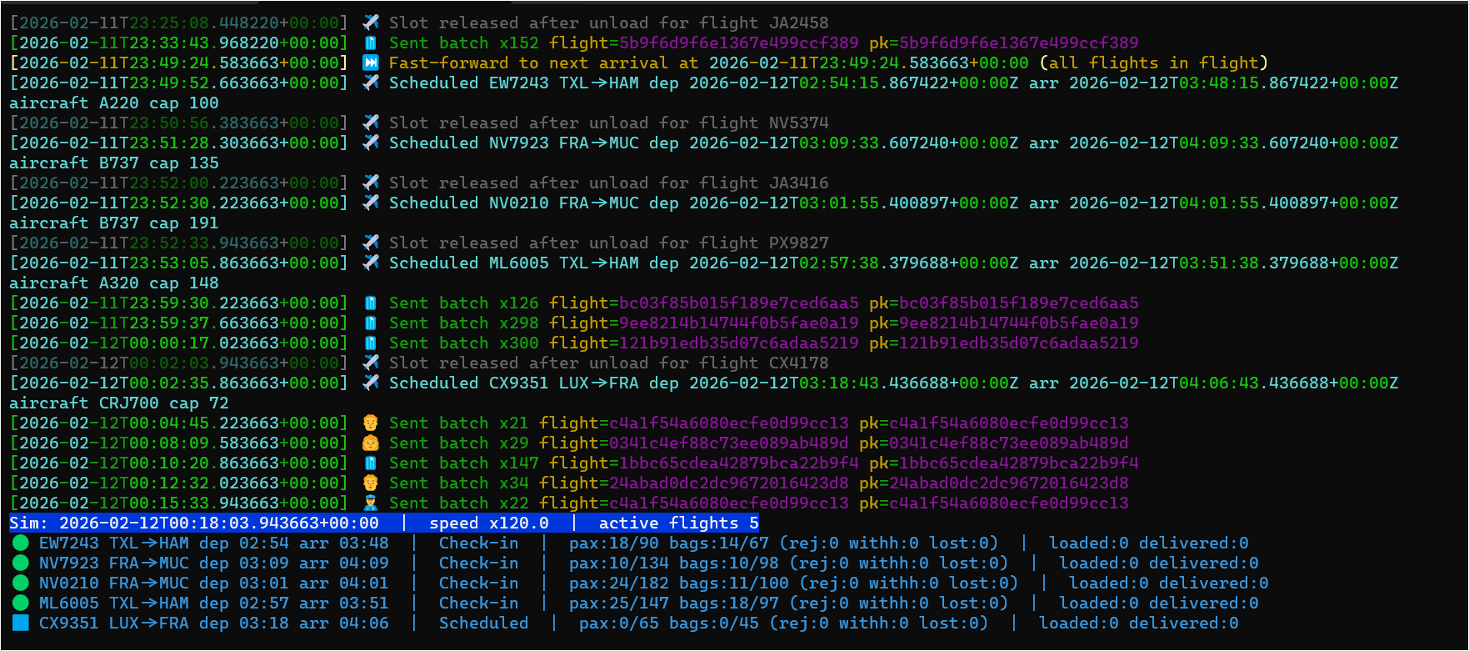
Step 5: Query the Data
Open a KQL Queryset in your workspace and start exploring. Here are a few queries I find useful:
Track a specific bag end-to-end
BaggageEvents_Silver| where BagTagNumber == "0014567891234"| order by Timestamp asc| project Timestamp, EventCategory, Location, FlightNumber
Find bags that haven’t been delivered (potential mishandles)
BagLatestStatus| where EventCategory != "Delivered" and EventCategory != "Lost"| where Timestamp < ago(2h)| project BagTagNumber, FlightNumber, EventCategory, Location, Timestamp| order by Timestamp asc
Baggage throughput by event type over the last hour
BaggageEventsByHour| where Timestamp > ago(1h)| summarize Total = sum(EventCount) by EventType| order by Total desc| render barchart
Average bag journey time (check-in to delivery) per flight
let CheckIn = BaggageEvents_Silver | where EventCategory == "CheckedIn" | project BagTagNumber, CheckInTime = Timestamp;let Delivered = BaggageEvents_Silver | where EventCategory == "Delivered" | project BagTagNumber, DeliveredTime = Timestamp;CheckIn| join kind=inner Delivered on BagTagNumber| extend JourneyMinutes = datetime_diff('minute', DeliveredTime, CheckInTime)| summarize AvgJourneyMinutes = avg(JourneyMinutes), BagCount = count() by bin(CheckInTime, 1h)| order by CheckInTime desc
Step 6: Build the Real-Time Dashboard
Create a Real-Time Dashboard in your workspace. Add tiles by writing KQL queries directly in the dashboard editor — no separate report tool needed.
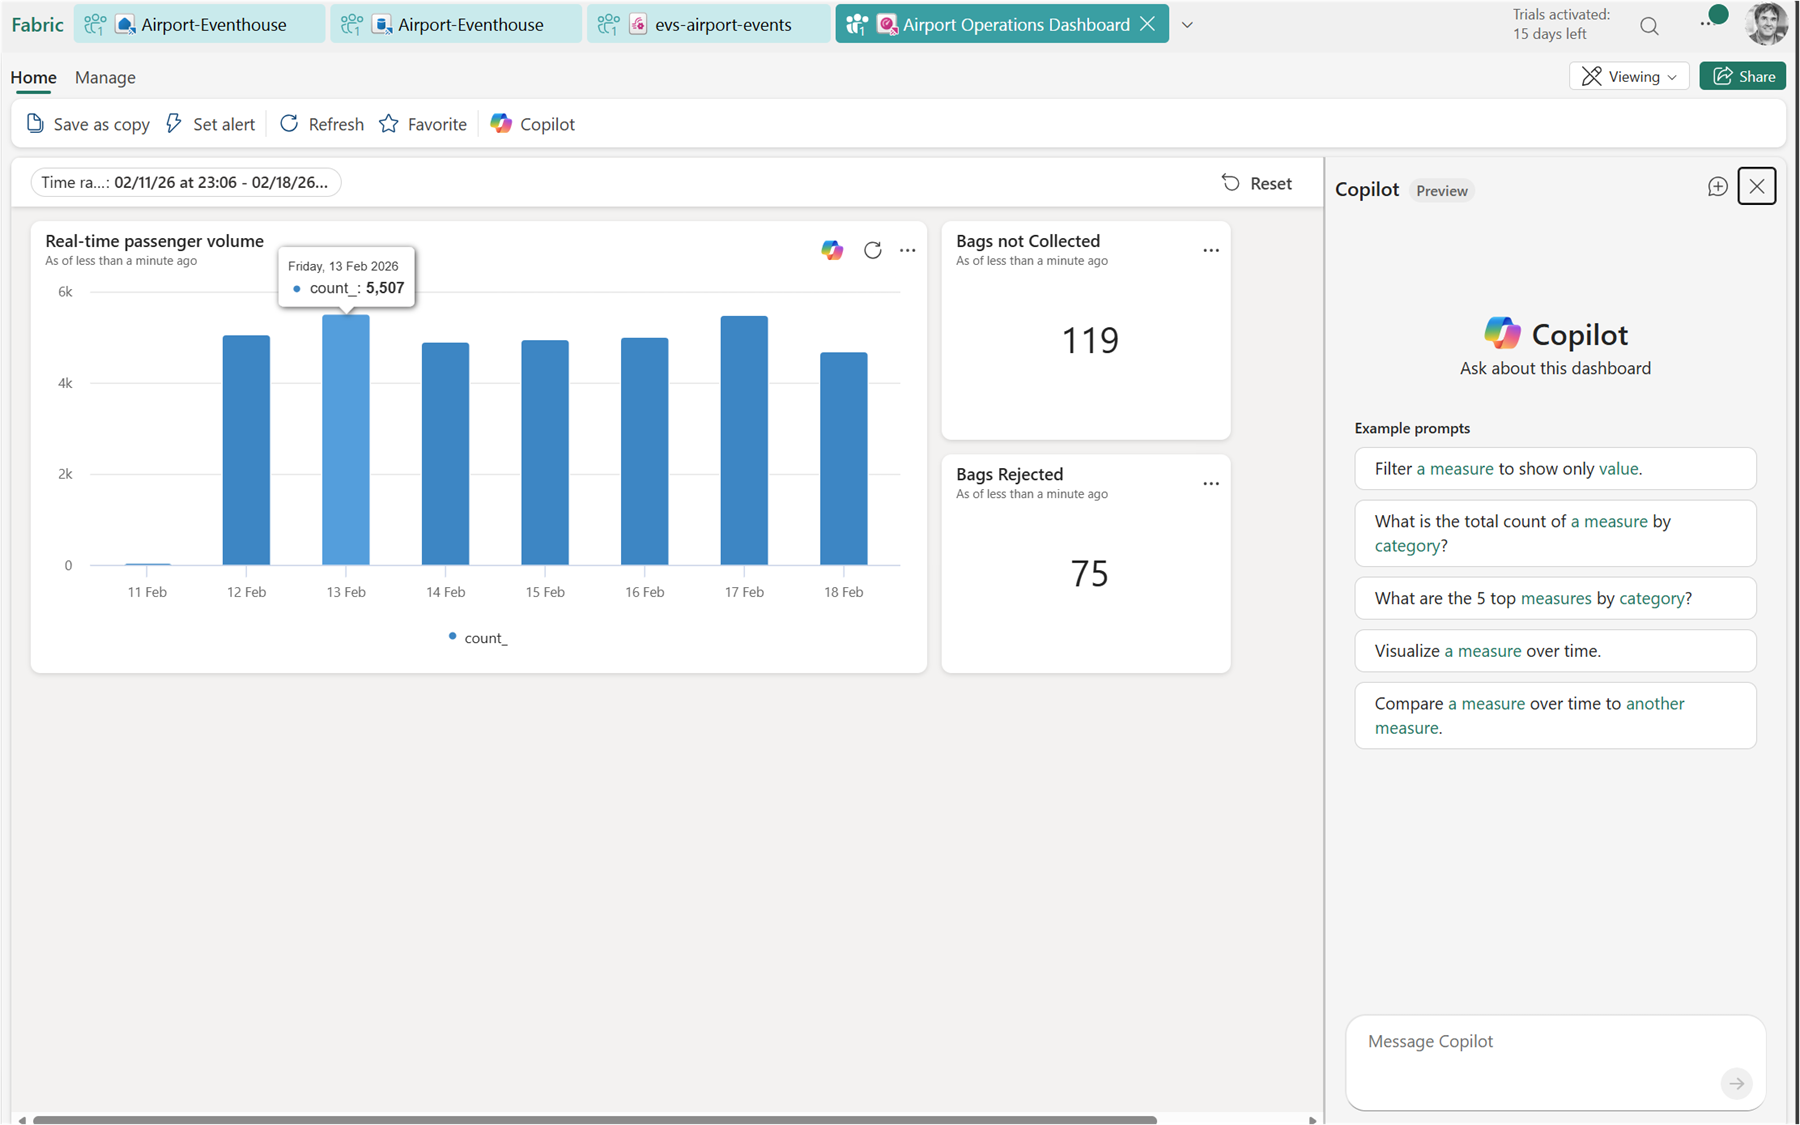
You can always view the query for each of the tiles by clicking on the … menu and then view query:
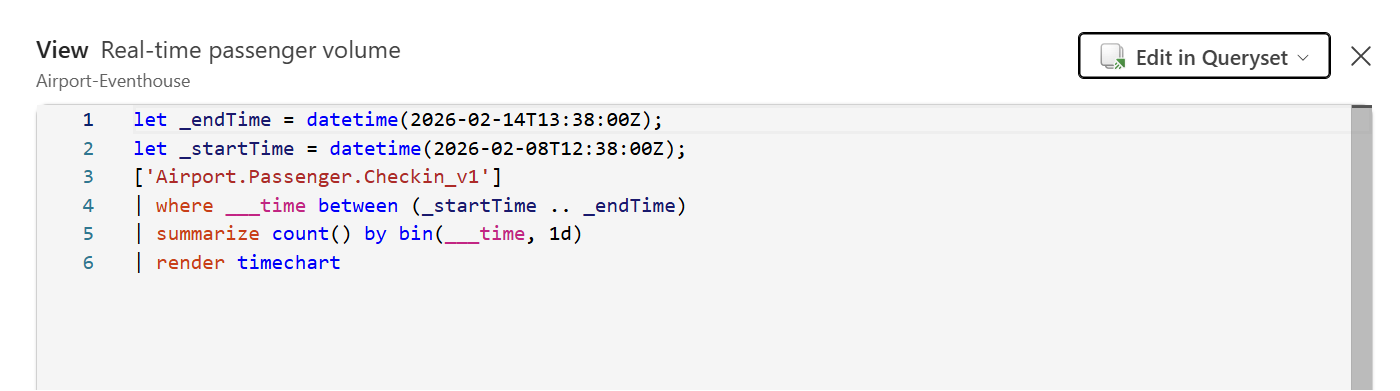
Useful tiles for this scenario:
- Bags in-flight right now — count of bags with a status other than Delivered or Lost
- Events per minute — a time chart showing ingestion rate
- Lost or rejected bags — a table filtered to
EventCategory in ("Lost", "Rejected") - Baggage throughput by hour — bar or area chart of event volume over time
Set the dashboard auto-refresh to 30 seconds for a live operations feel.
Step 7: Set Up an Activator Alert
Activator is Fabric’s alerting engine, and this is where things get genuinely useful. You can define a rule that watches a KQL query result and triggers an action when a condition is met.
From the Real-Time Dashboard, click Set alert on the “Lost or rejected bags” tile. Configure:
- Condition: row count > 0
- Action: send an email, Teams message, or trigger a Power Automate flow
- Check frequency: every 5 minutes
You can also create Activator items directly from the Eventhouse using Data Activator and write your own detection query — useful for more complex conditions like “bag hasn’t progressed in 45 minutes”:
BagLatestStatus| where EventCategory !in ("Delivered", "Lost")| where Timestamp < ago(45m)
Putting It All Together
Here’s the full flow end-to-end:
- Simulator generates CloudEvents and publishes to Event Hubs / Eventstream endpoint
- Eventstream ingests, routes by event type, and writes to Bronze tables in Eventhouse
- Update Policies automatically promote Bronze → Silver on ingest
- Materialized Views continuously aggregate Silver → Gold
- KQL Querysets power ad-hoc investigation
- Real-Time Dashboard shows live operations at a glance
- Activator fires alerts when something goes wrong
The whole pipeline is serverless from the Eventstream inward — there’s no infrastructure to manage, no Spark jobs to schedule, and no orchestration to babysit.
That’s what I find most impressive about Fabric RTI for this kind of scenario. The time from “event published” to “insight on a dashboard with an alert configured” is measured in minutes, not weeks.
Enjoy!
References
- Microsoft Fabric Real-Time Intelligence — Official documentation and getting started resources
- Eventhouse overview – Microsoft Fabric — KQL database engine in Fabric RTI
- Eventstream overview – Microsoft Fabric — Ingestion and routing for real-time data
- Update Policies in Kusto / Fabric — Automatic Bronze-to-Silver transformation on ingest
- Materialized Views in Kusto / Fabric — Pre-aggregated Gold layer queries
- Data Activator overview – Microsoft Fabric — Alerting and automation engine
- Baggage Handling Simulator by Clemens Vasters — Python CLI for simulating airport baggage events as CloudEvents
- https://github.com/calloncampbell/BaggageHandling-TypeB-Simulator — My fork and changes for Type-B Messages
- IATA Resolution 753 – Baggage Tracking — IATA’s mandate for end-to-end baggage tracking


