José Simões’ new book, Embedded Systems with nanoFramework, is a milestone for anyone who’s ever wanted to bring the power and comfort of C# into the world of microcontrollers. What I love about this work is how it breaks down the traditional barriers of embedded development—complex toolchains, steep learning curves, and hardware‑specific code—and replaces them with a modern, flexible, developer‑friendly approach.
At its core, the book shows how the .NET nanoFramework lets you build IoT and embedded solutions quickly, cleanly, and affordably. You can prototype in hours, adapt to customer needs on the fly, and move across ESP32.
José brings deep experience as the founder of the nanoFramework and a multi‑year Microsoft MVP, and it shows.
For a deeper dive on the book, checkout Sander’s post where he goes more in depth.
Last week, on December 4th, I presented at the Metro Toronto Azure Community meetup, discussing Microsoft’s announcements for Azure IoT Operations (AIO) at Ignite 2025. It was a fantastic evening — fellow MVPs Cliff Agius, Sander Van De Velde, Pete Gallagher, and Jose Simoes also took the stage with their own sessions on various Azure IoT topics.
IoT is a hobby interest of mine, so I genuinely enjoy keeping an eye on what’s happening in this space. When the Ignite announcements dropped, I was already deep in the details, which made putting the session together a lot of fun. This post is the written companion to that talk — a handy reference if you attended and want to revisit anything, or a full walkthrough if you missed it.
What is Azure IoT Operations?
If you’re new to Azure IoT Operations, let me give you a quick grounding before we jump into the announcements. AIO is AI-ready infrastructure for intelligent, adaptive operations. I describe it as more than a data pipeline — it serves as the foundation for integrating AI into the physical world. It enables systems that can perceive, reason, and act, which is precisely what modern industrial environments need to drive real operational efficiency.
What makes AIO stand out:
Built on Arc-enabled Kubernetes, ensuring a consistent management plane whether you’re on-premises, at the edge, or in the cloud
Unifies OT and IT data across distributed sites — effectively breaking down those frustrating silos between operational and business systems
Provides a repeatable, scalable platform that you can deploy across sites without starting from scratch each time
Extends familiar Azure management concepts to physical locations, which is significant for teams that are already acquainted with Azure.
Ignite 2025 Announcements at a Glance
The Ignite 2025 announcements for Azure IoT Operations are centered on three significant themes:
New edge-to-cloud orchestration capabilities
Tighter integration with Microsoft Fabric and Foundry
AI-driven observability and governance tools
Let’s explore each of the specific features that were announced.
Wasm-Powered Data Graphs
Azure IoT Operations now supports WebAssembly (Wasm)-powered data graphs, delivering fast, modular analytics right at the edge — eliminating the need to round-trip data to the cloud to get a decision back.
Wasm’s lightweight, sandboxed execution model is a natural fit for edge environments where compute is constrained, and every millisecond of latency matters. The modular nature of data graphs allows you to compose them from reusable pieces and deploy them consistently across diverse hardware profiles. For industrial scenarios requiring near real-time responses, this represents a significant advancement.
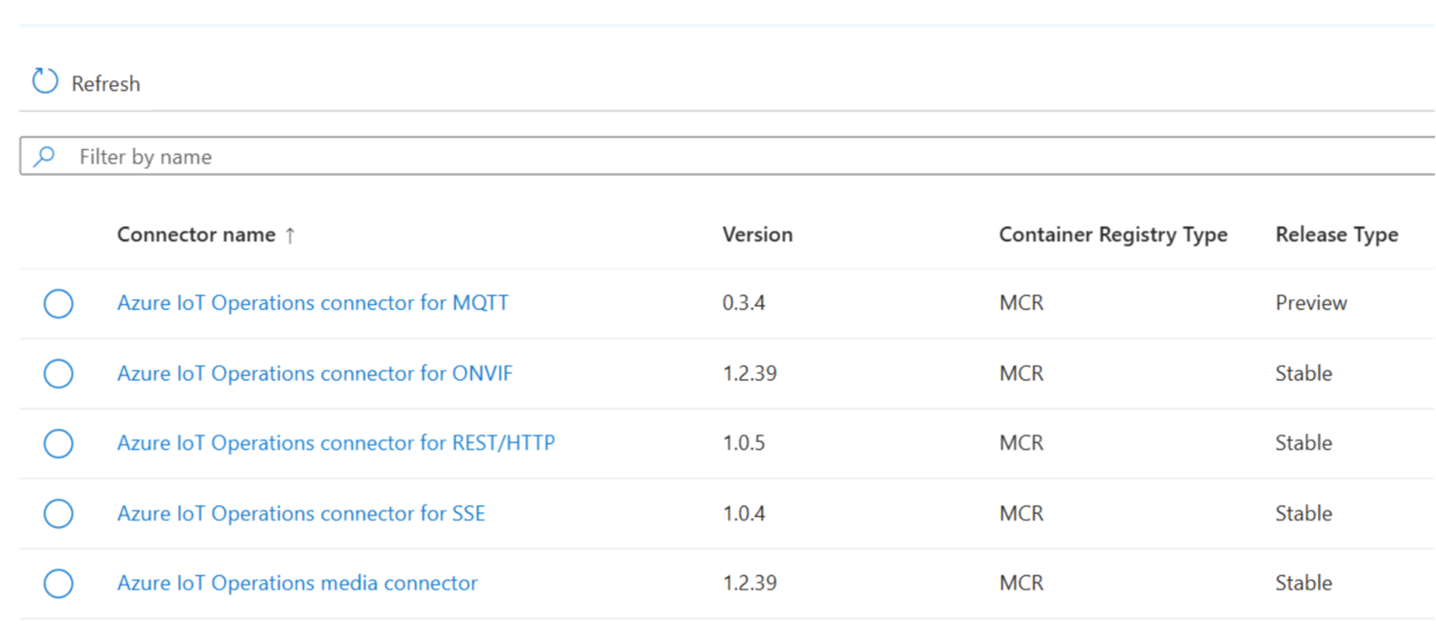
Expanded Connector Support
This release expands the connector library significantly. The newly supported connectors include:
OPC UA: Industrial automation and SCADA systems
ONVIF: IP-based physical security cameras and devices
REST/HTTP: General-purpose web API integration
Server-Sent Events (SSE): Real-time event streaming from HTTP sources
Direct MQTT: Lightweight pub/sub messaging for IoT devices
This expanded set is a big deal for organizations that need to bridge industrial OT environments with modern IT systems without building custom middleware for every integration.
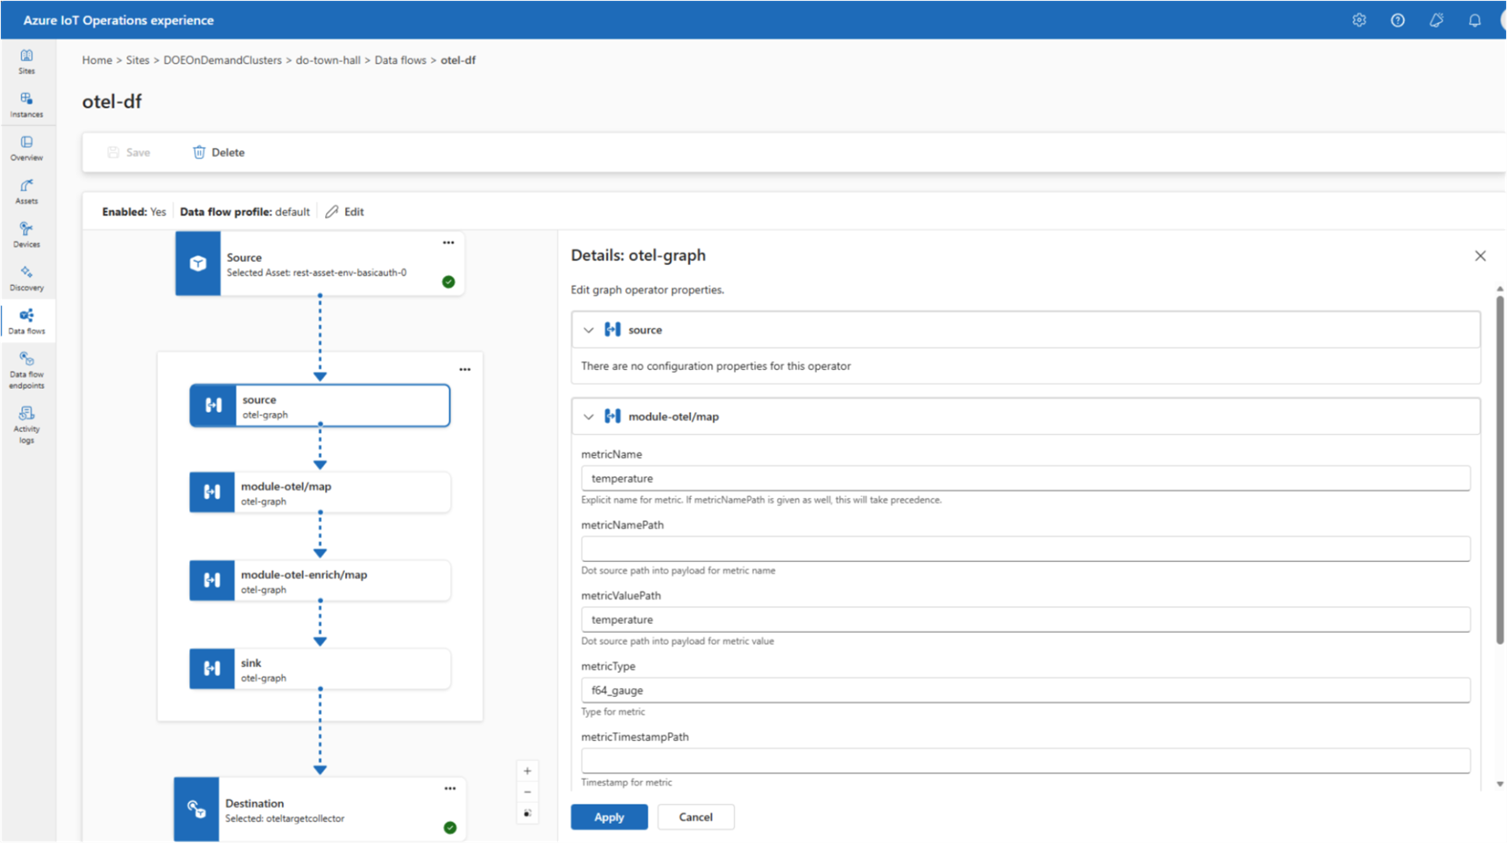
Data Flows Now Support OpenTelemetry
This is one of those updates that might not make headlines, but practitioners will appreciate it immediately. AIO data flows now include native OpenTelemetry (OTel) endpoint support.
OpenTelemetry has become the de facto standard for distributed tracing, metrics, and logging across the industry. Having AIO speak OpenTelemetry natively means you can route telemetry from edge devices directly into whatever observability platform you’re already using — Azure Monitor, Grafana, Datadog, you name it — without any additional transformation layers. Cleaner pipelines, less glue code.
Device Support in Azure Device Registry
Azure Device Registry (ADR) got a meaningful upgrade here: devices are now treated as first-class resources within ADR namespaces.
In practice, this means:
You can logically isolate devices within namespaces — critical for multi-tenant or multi-site deployments where you need clear boundaries
RBAC can be applied at scale, so the right teams get the right level of access to the right devices without ad hoc workarounds
Device management now aligns with the same resource model used everywhere else in Azure, which makes governance much more consistent
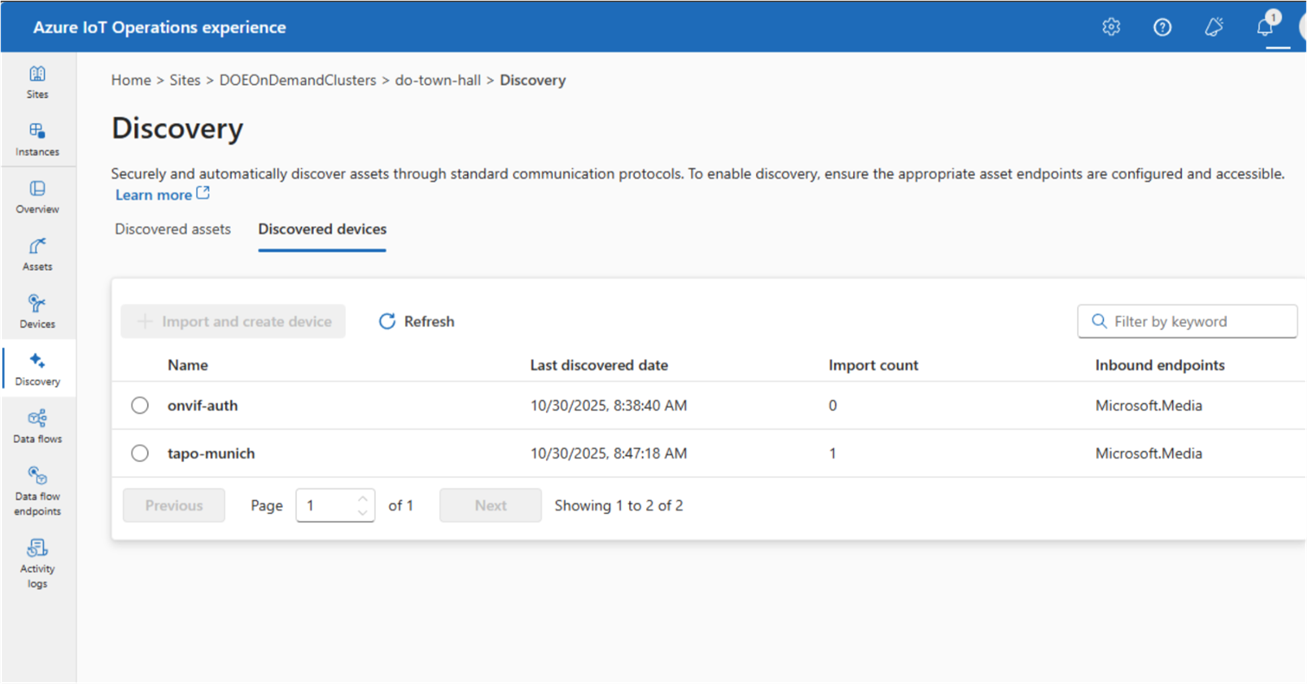
Automatic Device and Asset Discovery
If you’ve ever had to manually provision devices across a large factory floor, you know how painful it can be. This announcement addresses that head on. AIO now includes Akri-powered automatic discovery and onboarding:
Continuously detects devices and industrial assets that appear on the network
Automatically provisions and onboards newly discovered devices
Gets telemetry flowing with minimal manual setup
For large-scale deployments, this can dramatically compress rollout timelines and free up your team from repetitive provisioning work. It’s the kind of operational improvement that compounds over time.
Microsoft Named a Leader in the 2025 Gartner® Magic Quadrant
I want to close the announcements on a high note. At Ignite 2025, Microsoft shared that it had been named a Leader in the 2025 Gartner® Magic Quadrant for Global Industrial IoT Platforms. As someone who works closely in this space, I think this recognition is well-deserved and reflects how much AIO has matured as a platform over the past couple of years.
Summary
Azure IoT Operations is moving fast, and the Ignite 2025 announcements show that Microsoft is serious about making it the go-to platform for intelligent, AI-driven operations at the edge. From Wasm-powered analytics and a broader connector library, to native OTel support and automated device discovery, there’s something here for nearly every team working in the industrial IoT space. I’m excited to see what comes next.
I’m happy to announce a Highlights from Microsoft Build 2021 digital event next Thursday, July 15. Please join me and other local experts as we look to provide key insights from the event that will help you expand your skillset, find technical solutions, and innovate for the challenges of tomorrow.
Microsoft recently announced the introduction of Azure Sphere which is a low cost single chip computer that is described as a highly secured end-to-end solution for connected microcontroller powered devices. Azure Sphere includes three components working as one, a brand-new class of crossover microcontrollers running a secured operating system and supported by Azure cloud services. Along with advanced development tools, Azure Sphere is your opportunity to reimagine your business from the ground up.
What is surprising to know is that Azure Sphere is powered by Linux and not Windows.
Today I received my Starter Pack for Windows 10 IoT Core on Raspberry Pi 2. I purchased it from Adafruit, which you can order from here.
“Windows 10 IoT Core is a new edition of Windows targeted towards small embedded devices and maker boards such as Raspberry Pi2. IoT core is designed to work with low-level bus interfaces such as I2C, SPI, USB. You can write a Universal Windows Application using a variety of programming languages in Visual Studio to rapidly create maker projects.
You can use Windows 10 IoT Core to read sensor data, control actuators, connect to the cloud, create IoT applications and much more. The Starter Pack from Adafruit includes parts to get you started.”
Let’s get started!
Unboxing
The Parts
Essentials
Item
Quantity
Raspberry Pi 2 Board (Included in some versions of the Adafruit Starter Kit)
1
Adafruit Raspberry Pi Case
1
8GB SD card with Windows IoT Core
1
5V 2A Power Supply with MicroUSB Cable
1
USB WiFi Module
1
Ethernet Cable
1
Full Size Breadboard
1
Components
Item
Quantity
Premium Male/Male Jumper Wires
1
Premium Female/Male Jumper Wires
1
MCP3008 – 8-Channel 10-Bit ADC
1
Assorted LEDs
6
Potentiometers
2
Tactile Switches
3
Resistors
10
Capacitor
1
Sensors
Item
Quantity
Photocell
1
Adafruit BMP280 Temperature + Barometric Sensor
1
Adafruit TCS34725 Color Sensor
1
Setup
Plug in the HDMI and Ethernet cables and then plug in the power source. It was too late at night to setup the wifi, so I’ll leave that for another day.
It took about 5 minutes for the Raspberry Pi to boot up the first time.
Once it was booted up you see the following screen which allows you to interact with the device.
Next Steps
Now that you’ve connected your Raspberry Pi, you need to configure your PC and Raspberry Pi before your can start development.